 I wrote about my ideas for Jude’s room way back in August when I had a few-weeks-old baby who fed pretty often, but also napped about 70% of his day away and I had loads of time on my hands. We’d done nothing to his room apart from me making curtains in the summer, poor lad, he’s a real second child. He has Scarlett’s bedroom furniture aaaaaanndd… that’s pretty much it. That was his room. To be fair, he didn’t care, he’s a baby, but I was feeling bad about it. His baby book, which I recently forced myself to fill in, asks for the nursery colour scheme and accessories. I couldn’t bring myself to write “magnolia” and “haha”.
Eight-month-old Jude, however, is not the same as newborn Jude. I somehow concocted a bit of a silly plan to paint his room during his naptimes, while Barry was working away for a week, as a surprise. Granted, he has a solid nap each day, usually 2.5-3 hours, which is the only time I get anything done.
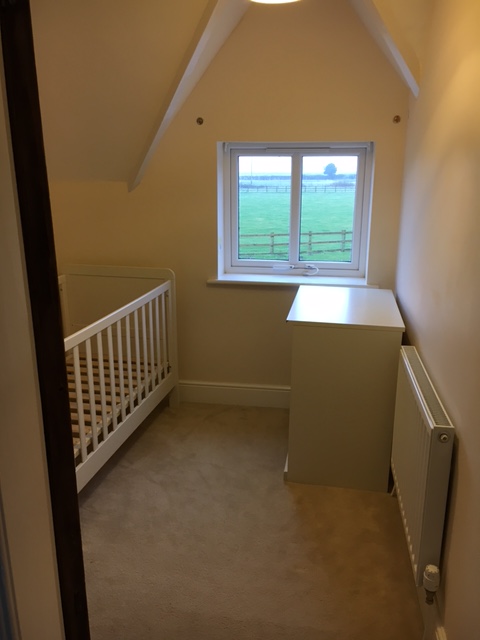
 His room doesn’t photograph well, it’s probably smaller than both upstairs bathrooms, but you get the gist. It didn’t look like a nursery, even with the cot taking up half the floor space.
I did some garage and shed recon before Barry flew out, careful not to move anything. I wanted a real “TA-DA” moment when he got back, so I just giggled at my little secret, and noted where everything was to speed everything up come painting day.
He left early on a Sunday morning, and as soon as I woke up, I got Scarlett on board helping me move the contents of his bedroom into our room. Walking leisurely up and down the corridor with a solitary book in her hand wasn’t going to empty the room quickly, but she was helping, that’s the main thing. My mum came by later to help me move the drawers carcass into Scarlett’s room and the wardrobe and cot just had to be covered as I wasn’t going to start taking furniture apart and I could work around them.
In the preparation phase, I found this website that gave advice on painting behind radiators (again, I wasn’t going to start trying to get it off the wall). I used a couple of ideas from there – covering the whole radiator in cling film and making a sponge stick painting thingy to get as far behind it as possible. I also had a good read through Wickes’ advice on how to paint a room, and made lots of notes from that.


I have to say, painting ceilings is the most thankless task there is. All that effort, covering all the furniture, getting a roller covered, paint in your hair and on your contact lens (oops), to paint something white… white again.
 Give me this satisfying yellow over white any day! This colour was called You Are My Sunshine, and honestly, the shade name alone made up about 50% of my decision. My intention was to paint two walls yellow and two grey, but once I started putting the yellow on, I realised it was very strong for this small room. Plus, I was pretty sure I only had enough for the one wall. So I made an executive decision to only paint the back wall to give a pop of colour as soon as you walk in and keep the rest neutral. The grey I used was Polished Pebble by Dulux. The whole room only needed one rollered coat of each colour, but a couple of coats on the edges with a brush.


I managed to paint the ceiling and roller the yellow and part of the grey in one nap on the second day, and was pretty pleased with that. I did spend the whole day getting in and out of my painting clothes so I didn’t cover Jude with paint, though! I’m a fairly messy painter with a habit of wiping paint on my jeans. My neighbour gave me a great tip that meant I could start and stop fairly quickly – she said to cover your paintbrushes in cling film and you don’t need to wash them between uses. I ended up using food bags, but same principle – it saved me tons of time.
On the third day, I finished all the rollering, taking my time over it to ensure I only needed one coat, then did the close up work with the brush – really difficult to make that ceiling line straight when you don’t have a stepladder! I ended up having to do some sections a few times to make it more even. The radiator sponge contraption worked really well. After the kids went to bed, I taped the carpet back with frog tape, tucking it in as tightly as possible.


 I had a “break” day mid-week when I went into work, and swung by Mothercare to pick up some Little Bird cotsheets my friend Margo had seen.
On the last day, I painted the beams, the doorframe, windowsill and skirting boards with white eggshell paint, which I’ve never used before. It went on really well, and although it was white on white, at least I could see where I’d painted! I did get really dizzy and shaky that day though, and had to keep having breaks. Definitely think I’d overdone it by this point.


Then it was just a matter of putting everything back and having the big reveal – almost ruined by Scarlett over FaceTime – but I managed to save the surprise.

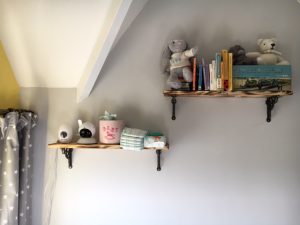
I still need to sort his lightshade out and maybe find a coordinating lamp, but for now, the finishing touch was putting a couple of shelves up, high on the wall above his drawers. We had high shelves when Scarlett was a baby, and it worked really well for storing nappies and other bits we wanted out of reach.
Barry found these GNER brackets on Amazon, and they go well with the feel of the room, plus tie in nicely to the railway line we have running behind our house.
He bought some soft wood from B&Q (it’s probably pine), and (any excuse) a blowtorch and basically crisped them up. We were going to stain them, but they looked lovely as they were, so we decided to mount them as is.
Jude’s tiny hand and footprint plaque is now up above the curtains, and the shelves are already in action.


2 thoughts on “Painting Jude’s room”